Monday 22 April 2013

Fail fast, fail often...


It's a phrase that's bounded around the web an awful lot. At phenoptix there are only the two of us and most of the failing duties seem to fall on my shoulders, fortunately it would seem that I'm starting to get the knack of it!

Today a new batch of PCBs arrived, designed by yours truly late one evening maybe even with a beer on hand. Well at least I hope I had a beer on hand. The layout was completed fairly quickly as the badge PCB contains only a battery clip and an LED. Using KiCad it was a free and fast process, however the LED contained in the stock libraries only has solder pads on the top layer - this I managed to sort out with a few clicks before sending for production. The libraries are also lacking a CR2032 clip module. I set to work building the said module and got the polarity wrong - first mistake that made it to the finished board!

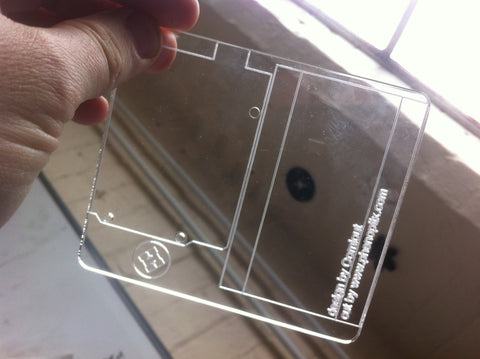
The idea behind this board was to make a striking badge with a nice shiny logo on it, so I set about emblazoning our logo not just in the silk screen but in the solder resist AND top copper layer. And so created the second problem in the final piece. I had bridged the connections of the LEDs in my fancy copper pour and managed to completely avoid pouring copper into the area that I wanted to make shiny. Bugger! The process of getting the logos into the copper and solder resist is a reasonably long winded but very satisfying one, check out Matt Little's blog for details (Matt is the fella behind our RGB Arduino board).

So what was the damage? 300 boards... all needing a touch with a dremel to undo the bridging and a little sticker placing to tell you to put the long leg on the LED into the other hole. Not too bad really, but considering the simplicity of the board I feel a little ashamed. I checked and checked before sending but next time I will check a little harder. 

What have I learned? Check the stock library parts for starters, if the PCB had been sent without the bottom solder pads they would be beyond fixing. Keep it simple (stupid), another cliche I know, but if I had been satisfied with the soldermask logo and had gone for a normal copper pour on the top layer the dremel work wouldn't need doing and the logo would be shiny in silver. Also I probably need to reach out a little more. There are plenty of folks I know that could have given the board a quick look over and saved me some time. That said, for the mistakes they look great and it gave me the excuse (if I ever needed it) to invest in the dremel drill press mount.

Riddled with errors (two errors for two components) but I think they still look rather nice! Very soon they'll be available in kit form from www.phenoptix.com

Wednesday 13 March 2013

Office Dogs - because we're a trendy start up!

It would seem to be all the rage to have office dogs. I only learned of the practice on hearing the sad news of Tatler's office dog Alan, who it would seem came to an unfortunate end on a chance meeting with a revolving door. Still we don't have a revolving door so I decided to get not just one but two dogs to improve life at The Workshop (that's what phenoptix international HQ is called). They seem to have settled in well enough! May I introduce you to Lilly and Dillon.


For the record they aren't really office dogs, they're my dogs, they live with me and my family at The House (I'm creative when it comes to naming spaces). They're having more time than usual with me at The Workshop as we're having some work done at The House, but I think we'll have them back at the office a bit more often as it's nice to have them around. 

Also I think a ball thrower should be added to the projects list, like the one that's doing the rounds on social media at the moment (I know it's an old video by the way as my wife and I have watched every Dachshund video on youtube). If you want to help feed the office dogs, buy some stuff from us at phenoptix.com

Thursday 7 March 2013

Acrylic Obsession.


What started as a request by the Hackspace for some prototyping plates turned into three solid days of obsession. 

Starting out with Oomlout's ubiquitous design (http://www.thingiverse.com/thing:716) ubiquitous for a prototyping plate or sledge as some call them my first obsession was making something a little bit special for the folks at the hackspace. An epic etch!
These are epic as they take a long time on the laser as it rasters the image. I've got a small laser cutter and it can cut four at a time but four of these etches was just too intensive for the benefits, when you consider that an Arduino and a breadboard where going to be stuck over the top of this beauty. Also adding outlines to the front of the board caused it to look busy. So I tried a couple of other etches.
You can see our logo on there for the first time. It was suggested that the boards were dual branded for the Arduino event at Nottinghack, but really I'd done very little to the design to warrant our design on the board without attribution and besides with our logo being so small it looked busy and the etch was crap. An attribution was added and a mention that we cut them.

Triple branding! Adding an Arduino Uno and a breadboard to this I was kind of happy, it was as good as the Adafruit board I'd received a few years back in my ARDX kit. It's neat and compact but ever so slightly squashed. The next stage should have been to tile the design and cut out en mass from the the laser cutter. But two things stopped me. First was the wastage on my acrylic sheets. We use a 300 x 200 sheet as standard. As our supplier ships 600 x 200 sheets that we cut down to fit into our machine. Seems like a long way around but the guys we use supply cast acrylic, which is rarer and much much better quality than the cheap extruded stuff you see all over the interweb. Second, someone tweeted a picture of Adafruit's new ARDX kit. A picture perfect in almost every way! I suggested that the Arduino was the wrong way around on their board, but the reply was it could go either way! WHat?! An improvement?! Also their board was roomier, and as we had all the extra acrylic why wasn't ours? The next iteration awaited!
Reversible. Neat etches. Room around the edges and one brand in the middle. Sweet. Also in opposition to the epic etch of earlier these were quick as we were no longer rastering but cutting at low power. At least four times faster. Still could do with some pazazz. Enter fancy edge glow acrylic (and R2-D2)...

This version we loved and cut with aplomb. Lots of lovely colours were cracked out and we even used the DSLR for the first time in a while!
 
With enough cut for the Hackspace, happy with the work we rested. But then what? Wait? No? Why? Back in the depths of time, well November, we created the Pibow Proto Plate (http://www.thingiverse.com/thing:35376), why hadn't this been incorporated into the design? A plate that could hold a Raspberry Pi would surely be of some use as well as an Arduino and as bonus be used with the Pibow. So here we are:
 
Again happy with the design, we move onto fancy acrylics
The result still owes a lot to the original design and it's great that it was provided under a licence where we can all benefit. Our design is also provided under the same licence so please copy, share and attribute. If you want a board but don't have a laser check out our listing here: http://www.phenoptix.com/products/arduino-prototyping-board-acrylic-plate-and-mounting-hardware or cut your own at your local hackspace.

Friday 26 October 2012

EMF Camp


This is one of my long long overdue planned blogs! Way back at the end of August / beginning of September five hundred (or so) hackers converged on a field in Milton Keynes and pitched up their tents, plugged in their laptops, 3D printers, laser cutters (ok laser cutter), logged onto the field's wireless network (or wired!) and got on with swapping knowledge and drinking beer.

As man in charge (sometimes) of phenoptix, I was there as a (in fact the) vendor for the camp. Later dubbed as the silver tongued seller of shiny things.


My planning for the event was somewhat hampered by the planning that is involved in selling and moving out of a house. So what happened was I filled three boxes with the things I thought were cool, put them in a van and drove to Milton Keynes! On arrival I was greeted by a staff that seemed to be a many armed beast, fighting the fires associated with running an event for the first time! My Tilda badge wasn't ready yet and nobody was really sure where I was supposed to go. So like the folks at Cheers, I went where everybody knew my name (or at least some of them did!) Nottinghack's super amazing laser enabled camping zone. 


Unpacking and setting out was the first challenge. I decided to have a beer instead and leave it for the next day. Again Nottinghack trumped all with a firebowl and 80 ish meters of EL Cable (the latter from an anonymous, handsome and enigmatic donor).


Fuzzy headed the next day I started to set up my stall, quite literally! From the first item that went onto the table we had visitors and started talking shop, it's was the first time I've had face to face contact with my customers and it was a really amazing experience. This was day one!


 Man it was busy! But just so good! My view of the event was mainly from the other side of this table but I met so many interesting people it was well worth it. It was probably 21:00 when I decided to pack up for the night and get out my soldering iron and enjoy a beer.


I've wanted to solder a LOL shield for some time and it was nice to sit down besides other people tinkering and chatting whilst also tweeting about it! The creator of the shield - Jimmie Rodgers, even tweeted back with his record soldering time! About 40 minutes I think!

The Sunday saw me start out with a bit of a stock take, of course this didn't last long again as people wanted to talk cool stock! I ended up spreading my stock across the ground sheet and becoming a one man electronics bazaar. Not stopping until it was time for me to head home and finish moving house!


My take on the EMF camp was from a very narrow view point, quite literally, as I saw it over the top of my stock. But it was a really great and friendly event. I met so many cool people that I thought it couldn't be topped. 

A lot of people made the camp amazing for me, the hospitality of Nottinghack - Dominic and James in particular. Paul of Pimoroni who appeared with a coffee for me on the Sunday. The lock pickers with their safe cracking stories. All of the organisers who worked so hard to make sure everyone was fed, watered, sheltered, powered and networked. Hats off to all who attended though, you all made it a great event.


Friday 5 October 2012

Big Blog Backlog!

An odd thing. I once struggled to blog due to the apparent lack of content, walking to the shed every day, packing LEDs into bags and walking back again. Seemed that there wasn't so much to talk about back then. Oh how things have changed. Now I'm a tad busier with life in general but with work there's so much going on now! Lots of new products, lots of events to write about, so much so that there is currently a creative log jam going on in my head. First I want to write about EMF Camp, then my trip to New York to the Open Hardware Summit, then to Adafruit HQ, then to Maker Faire! I could even write about my trip to the New York Museum Of Modern Art in search of my coffee machine and the merry White Rabbit chase that it gave me amongst the Monets and Van Goghs.


Lets see what comes out first...

Wednesday 15 August 2012

Family Joules at Derby Makers


Last night I attended a fantastic workshop at Derby Makers, run by Graeme Smith and his daughter, where we made a legendary piece of hackery - The Joule Thief. This is something I've seen all around the internet but never got around to gathering the parts for. Probably my favourite incarnation saw the JT fused with sew-able circuits to make the "Cat Burglar". 


Bat Burglar would have been more appropriate, but probably wouldn't have made such a cute construct. For those who have never heard of a Joule Thief or have but don't know what it is. A JT (I've typed it in full enough!) is a circuit that allows you to run an LED on a nearly dead battery. For those that don't find that amazing, consider that the LED I used runs from 3.4V and a fully charged AA battery gives at best 1.5V. For those that don't find that amazing see here (might be more your sort of thing).

It was one of the busiest Derby Makers sessions that I have attended and there were lots of new faces eager to get their hands on a JT kit. Comprised of a lovingly etched PCB, battery holder for the nearly dead battery, a transistor (2N3904), a switch, a resistor (1K) a ferrite bead, a long length of magnet wire and perhaps most importantly an LED. 


A keen group had arrived early and started to make headway on their JTs, which was fortunate as it freed up Graeme to help a second table and get them winding their ferrite cores with magnet wire (the first step). The bead comprised the complicated part of the procedure, but this was all nicely explained and had a great diagram on the second page of the instructions.


Once the bead was wound and the ends identified we got onto some soldering (and eating of biscuits).


What is that excellent piece of product placement, er I mean PCB holding equipment, I hear you cry? That is the Panavise Jr. Available from phenoptix.com. Sorry about that, it's the first one in four blogs though. 

The soldering stage was a blur as the red mist descended and the camera was forgotten. I was soon the proud owner of a working JT!


All that remained for the workshop was to discuss how the JT works. Which hopefully will follow in another blog post. 


But to summarise, it was a great evening at Derby Makers where people of all ages and abilities made something together, helped each other and enjoyed discussing and showing off what we'd made. If this is something that would interest you then please come along to an event! They run every second Tuesday at the Derby Silk Mill. If you're not able to make it Derby Makers why not see if there's a hackspace in your area?

Thursday 9 August 2012

Lush Visit...

Don't know how long this is going to last, a blog post a day for three days. Suppose it's starting to make up for the two years without one.

Yesterday Iain Sharpe of Lush Projects (or @alphabetter as he's known to the twitter sphere) came round for a cup of tea. It was a long overdue visit as he had planned to come and visit us in the cosy LED Shed some time back, it would seem we've all been busy though and it's much easier having visitors here to the Workshop.

Iain got our now standard tour, where I show people draws full of LEDs, Arduinos and other goodies and as usual something caught his eye. Since they could be for his next world domination project I won't link the item.

We sat down for our cups of tea around my spectacularly cluttered desk and had a look at Iain's projects, his world famous Vibrati Punk Console 


and his new project the LushOne modular synthesiser, which comes beautifully clad in Acrylic.


They are, for me, fantastically fun items, but to the musically minded I'm sure they are far more interesting. They are exceptionally well made and the Punk Console is a nice easy solder with less than 60 joints and comes with really sturdy pots so they wont break during a hard jamming session. The LushOne would be a bit of a labour of love, a good hour's soldering for the experienced solderer but well worth it as it is pregnant with musical possibilities. 

We spent the rest of the visit discussing the joy of making kits and their various logistical intricacies. Something we hope we're going to be able to help Iain and others with. The eagle eyed amongst you will have also noticed another kit nestled by my keyboard, awaiting some TLC from a hot soldering iron.

We wrapped up and I was left a Vibrati Punk Console to try and we hope we'll be able to stock them in the near future. At last I have something to do with my old Illy coffee tins!